The Print Options
Depending on the commercial form that should be printed, you will have to change or add additional Addition (in Latin: addere) is one of four basic operations in arithmetic. In primary school and in common language it is the expression used for the adding of two or more numbers. options The word option (from Latin: optio = free will) used in computing means a choice. In CARAT it is normally used with a list box. before printing. To this serves the Print options dialogue Dialogue, dialogue windows or dialogue fields are special windows in software applications. Dialogue windows are displayed by application programs in different situations to request input or confirmation from the user.. Because the requirements for each form are different, this dialogue will offers you special settings for each form.
The print options dialogue, with its possible settings for the selected form, will open as soon as you have selected a commercial form for printing or print preview.
The print options for:
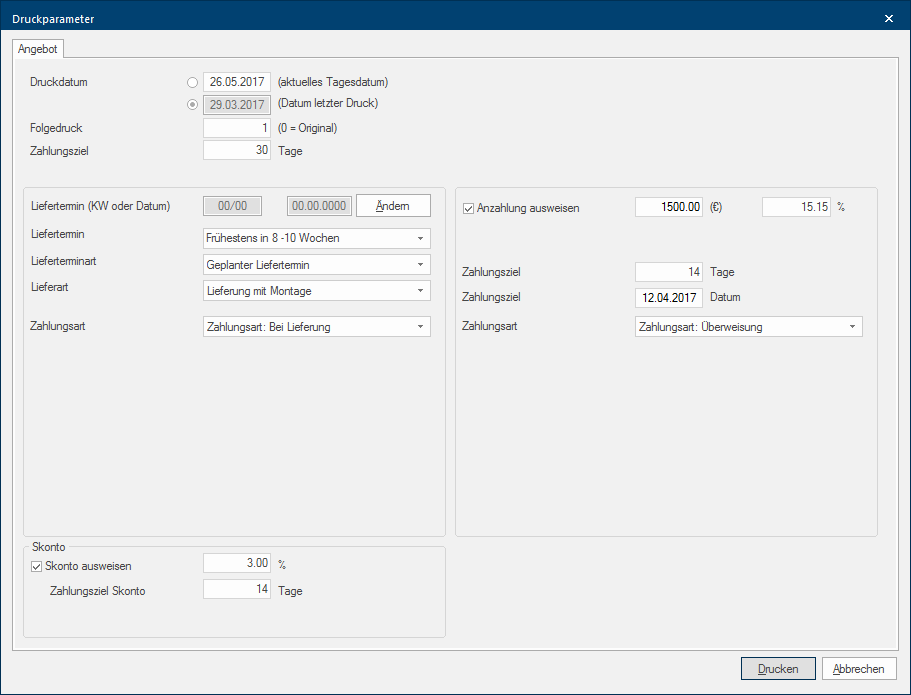
The print options for the forms quotation, order and sales contract are primarily about delivery date and payment procedures. The print date can of course also be altered.
| Name | Description |
|---|---|
|
Print date |
The print date allows you to choose between the current date of the day or, if already done, the date of the last print. You can of course also pre- or anti-date the current date of the day of the print date via the date field. The print date will be shown in the reference line of the form. |
|
Second print |
The print copy field is an indicator that lets you know if a form has been printed for the first time or if it is a print copy. The information of the print copy can be printed in the reference line underneath the date. For a first print, a 0 will be displayed in this field. The number 0 indicates the original, thus the first print. As soon as you, later on, reprint the same form, the number in the field print copy will be incremented with 1, thus you can recognise which printout it is. Each further printout will be marked with copy (1st Copy, 2nd Copy, ...). |
|
Term of payment |
In the field term of payment you can enter a number of days that you allow your customer as term of payment after delivery. On the form this input will later be used accordingly in the area cash discount information. |
|
Delivery date (CW or date) |
Through the fields CW or Date you can enter a customer delivery date. Through the system options you can enter specific specifications for both input possibilities. The indication of the delivery date as CW or date will be printed in the area additional information. |
|
Delivery date Delivery date type Delivery type |
Through this list box If several options are provides for one function provides, are these often shown in a list. Please click on the little black triangle in the right margin to select the desired option. you can fall back on a list of short text modules to allow for more information regarding delivery date, delivery date type or delivery type. This information will be printed in the area additional information. The text modules for the particular list boxes can be specified in the system options on the page customer delivery token. The list box delivery date has a special feature. In this field you can not only use entries from the list but you can also enter directly a specific text. |
|
Payment method (remaining sum) |
Through the list box payment method you can specify, if required, how the rest-payment at delivery should take place. This specification will be printed at the end of the form, in the payment agreements area. You can enter a relevant text for the payment method in the system options. |
|
Show deposit |
Through the show deposit checkbox A checkbox is a standard element in a graphic user interface. A checkbox has, in most cases, two states (set or not set). These usually correspond to a yes/no selection. you can specify if a deposit should be displayed. Additionally you can enter a deposit as value or as percentage directly through the following input field. The deposit will be printed at the end of the form, in the payment agreements area. |
|
Payment term (days) Term of payment (date) |
Through the days and date input fields you can specify a separate term of payment for the deposit amount, which will be printed together with the deposit amount in the payment agreements area. It is enough to specify only the days as term of payment, based on the print date the date for the term of payment will be determined automatically. |
|
Payment method (deposit) |
Through the payment method list box you can specify, if required, how the payment of the deposit should take place. This specification will be printed at the end of the form, in the payment agreements area. |
|
Show cash discount |
Through the show cash discount list box, you can arrange if a note about the cash discount should be printed in the payment agreements area. Additionally you can specify through the following input field a different cash discount percentage, if necessary. |
|
Term of payment cash discount |
Through the term of payment cash discount input field, you can specify a separate term of payment for the cash discount agreement. Normally, this field will initially display the default setting that you have specified on the page cash discount in the system options. |
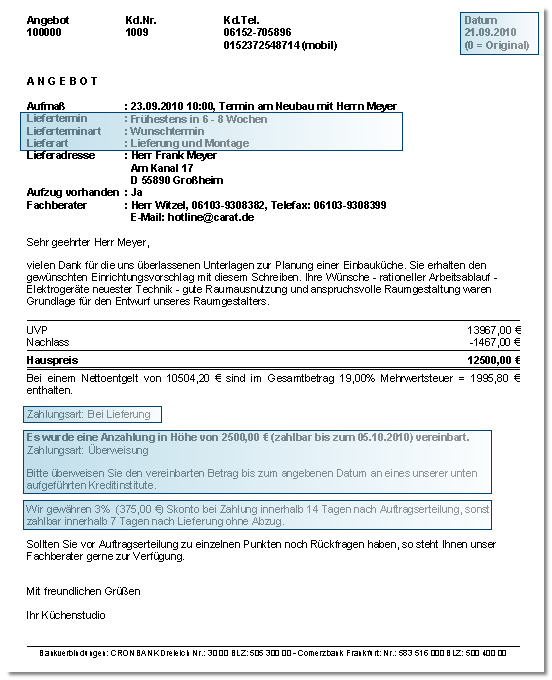
- The following picture shows you a sample form on which you can recognise how and where the information described above will be printed.
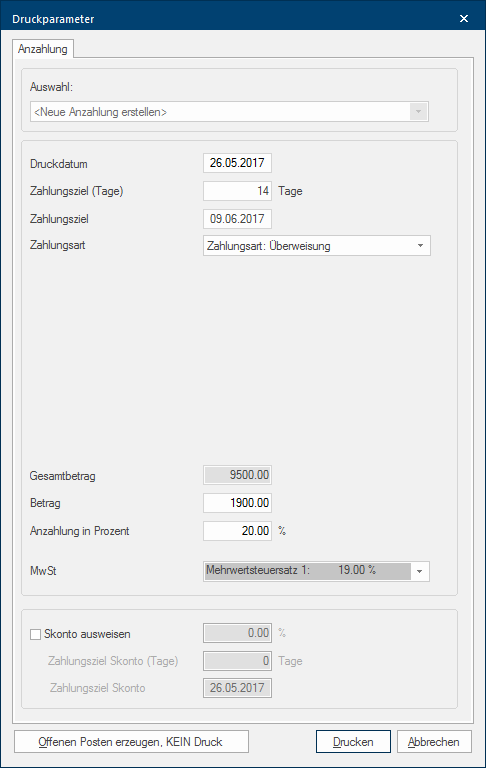
In order to be able to print one or more deposit invoices for an order, you can use the form deposit invoice. A list box for selecting already created deposit invoices is located in the upper part of the print options dialogue. If no deposit invoices are created yet, this list box will be greyed out.
After at least one deposit invoice has been created, you can specify through the list box if you would like to create a new deposit invoice or if you would like to call up the deposit invoice to reprint it.
| Name | Description |
|---|---|
|
Print date |
Through the print date input field, you have the possibility to either use the displayed date (with the first print it is the current date) or to pre- or anti date the date to be used for the printout. The print date will subsequently be shown in the reference line. |
|
Payment term (days) Term of payment (date) |
Through the days or date input fields, you can provide for a term of payment for the deposit amount. It is enough to specify only the days as term of payment, based on the print date the date for the term of payment will be determined automatically. This specification will be printed at the end of the form, in the payment agreements area. |
|
Payment method |
Through the payment method list box you can specify, if required, how the payment of the deposit should take place. This specification will be printed at the end of the form, in the payment agreements area. |
|
Gross total |
The gross total of the order is listed in this field. Modifications to this field are not possible because this field will be only used for the calculation of the deposit amount percentage. |
|
Amount |
In this field you can enter the desired deposit of the deposit invoice as amount in currency. |
|
Deposit in percent |
In this field you can, if required, enter a percentage to automatically calculate the deposit amount based on the gross total. Provided that you have entered a standard value for the deposit percentage in the system options on the page calculate, this percentage will be automatically preset. |
|
VAT |
Through the VAT (Value added Addition (in Latin: addere) is one of four basic operations in arithmetic. In primary school and in common language it is the expression used for the adding of two or more numbers. tax) list box, you have the possibility to change the underlying VAT rate. You can use this for example to create a deposit invoice that shows no value added tax. |
|
Show cash discount |
Through the show cash discount list box, you can arrange if a note about the cash discount should be printed in the payment agreements area. Additionally you can specify through the following input field a different cash discount percentage, if necessary. |
|
Payment term cash discount (days) Term of payment cash discount (date) |
Through the days or date input fields, you can provide for a term of payment for the cash discount agreement. It is enough to specify only the days as term of payment, based on the print date the date for the term of payment will be determined automatically. Normally, this field will initially display the default setting that you have specified on the page cash discount in the system options. This specification will be printed at the end of the form, in the payment agreements area. |
|
Creating outstanding item, no print |
Providing that you use the outstanding item list, and your customer wants to pay the deposit directly in cash, you don't necessarily have to print the first deposit invoice. In this case it is sufficient to click Typically the LEFT mouse button is pressed once quickly, if not specified differently. Clicking will either mark an object, or when clicking on a button, the execution of the desired activity (e.g. OK, Cancel, Close). the button In dialogue windows you always find one or more buttons that can be activated by clicking on them. Typical functions for buttons are e.g. OK, Cancel, Apply. Buttons are always activated by a single click with the left mouse button. Create outstanding item, NO print. As a result, an entry in the outstanding item list is created for this planning, in which you can post the deposit, so that CARAT can take this deposit into account accordingly in the final invoice. A deposit for which you have only created an outstanding item can not receive an invoice number. Therefore, such a deposit does not appear in the top list box. |
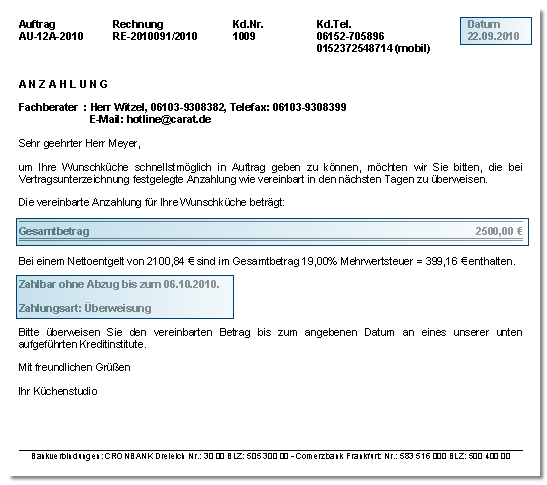
- The following picture shows you a sample form on which you can recognise how and where the information described above will be printed.
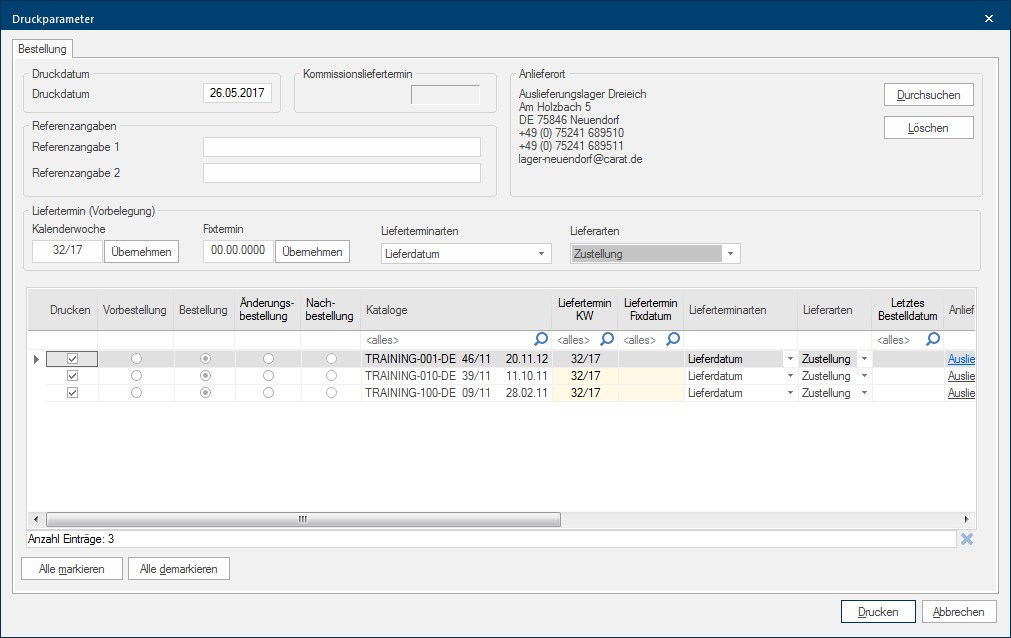
Via the print options dialogue, you can select for which supplier a purchase order should be created. Furthermore you can complete, through this dialogue, the for a purchase order missing necessary information. This can be for example, besides the order type, the delivery date or a delivery point different from your legal company details.
| Name | Description |
|---|---|
|
Print date |
Through the print date input field, you have the possibility to either use the displayed date (with the first print it is the current date) or to pre- or anti date the date to be used for the printout. |
| Reference data | There are two input fields available in the reference data area, you can use these to enter additional company related information concerning the purchase order. These are two 30-digit alphanumeric An alphanumeric character is in the narrow sense either a letter or a number. The term is used in telecommunications and computer technology. input fields. In the system options the name of this field can be freely assigned by you. |
| Delivery point |
Provided the company address and the delivery point are identical, please leave the area delivery point empty. Because, unless otherwise specified, all purchase orders will always use your legal company details with the appropriate address.
|
| Delivery date (default setting) | Through the delivery date area, you have the opportunity to quickly and easily assign a delivery date as calendar week of as fixed date for all in the lower range listed suppliers purchase orders. If you have activated the kind of delivery date and the kind of delivery options in the system options, are in this area additionally the relevant list boxes available, so that you are able to preset also these specifications for all suppliers purchase orders. |
| Suppliers overview | The individual catalogues used in the planning, and for which you can create a purchase order, are listed in the lower area of the dialogue. By using the different columns of the table, you can enter individual settings for each catalogue, if necessary. |
The Catalogue Tables
| Name | Description |
|---|---|
| Via the print column, you can use the checkbox per catalogue to specify if the respective catalogue order should even be printed. The buttons Select all and Deselect all are available at the bottom margin of the dialogue, herewith you can quickly select or deselect all orders. | |
| Advance order | The radio button A radio button is a standard element of graphic user interfaces. In contrast to a checkbox, when used in a group, only one radio button may be marked at a time. The name radio button comes from its similar behaviour to selecting a radio station on an old fashioned radio: when one button is pushed the others pop back out. advance order is a special case. This kind of purchase order should only be used in consultation with the respective supplier. |
| Purchase order | The radio button purchase order will always automatically be activated for the first purchase order. That purchase order contains always all specifications about the planned articles as well as all used master data Head data in CARAT is the generic term for all details that are needed for the design and ordering of a kitchen. This is for example, the selected program or variations in carcase versions, or worktop edge.. |
| Modified purchase order | If you want to print a purchase order again after having changed a planning but without having added new articles, the modification purchase order radio button will automatically be activated, in order for the supplier to be able to recognise that it is not a new purchase order. Also in this case the order contains always all specifications about the planned articles as well as all used master data. |
| Supplementary purchase order |
If you want to print a purchase order only for new articles that you have added at a later time to a design, you can activate the supplementary purchase order radio button. A Supplementary purchase order always only contains the new planned articles. If, through changes, also articles are eliminated you should always select the modification purchase order radio button.
|
|
Catalogues |
For a better overview are besides the catalogue name also the catalogue version Due to modifications to a yearly catalogue more than one following variation of a catalogue can be given. This is called catalogue version. and catalogue date displayed in this column. |
|
Delivery date CW |
In this column is the desired delivery date for the manufacturer deposited. Usually a delivery date based on the stated customer deliver date is already entered here. Additionally you can specify an advance delivery date in the catalogue master data which here will be automatically taken into account. |
|
Delivery date fixed date |
In this column you can, if necessary, specify a precise delivery date. |
|
Delivery date type Delivery type |
These columns will only be shown if the relevant suppliers delivery tokes have been activated. |
|
Order date |
After you have generated a purchase order, the date of the last purchase order will be shown in this field. |
|
Delivery point |
The delivery point field should only be changed if you want to state a from your legal company details deviant point of delivery. After clicking on the underlined input a selection dialogue will open through which you can select if you want to use an address from the customer or from the address administration. |
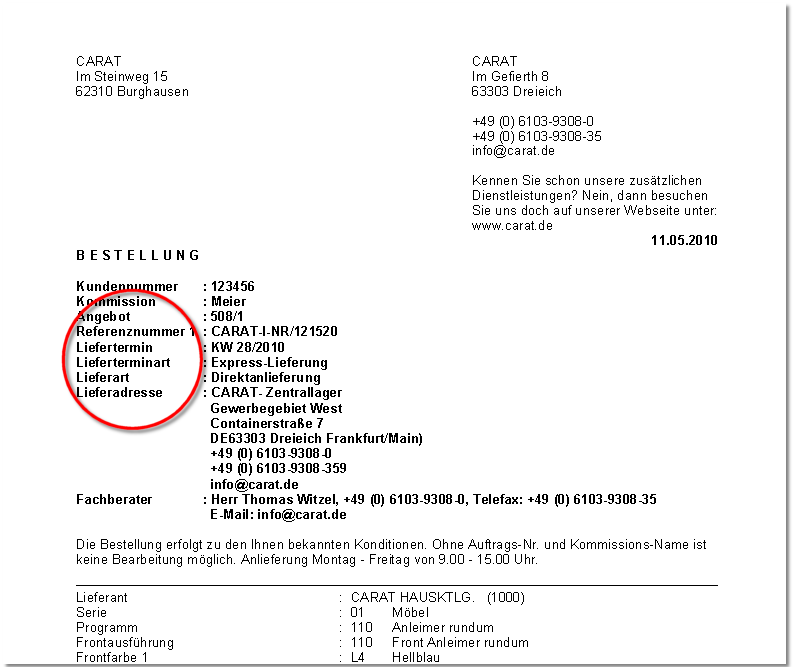
- As an example is in the following illustration a print preview shown, in which all setting possibilities have been entered.
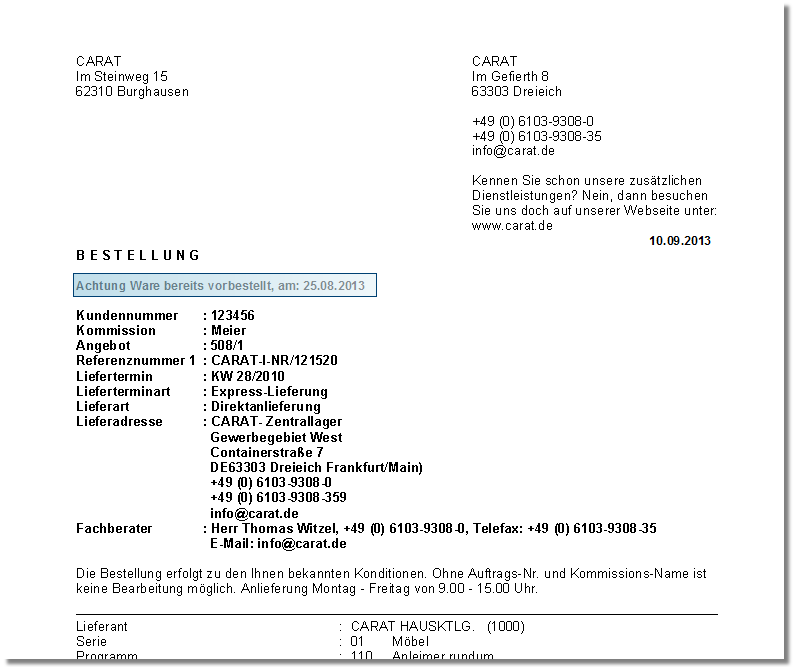
- As far as you have previously sent your purchase order of the order, as advance order to your supplier, a note about the advance order already made with the date of that advance order will be printed with the actual order automatically.
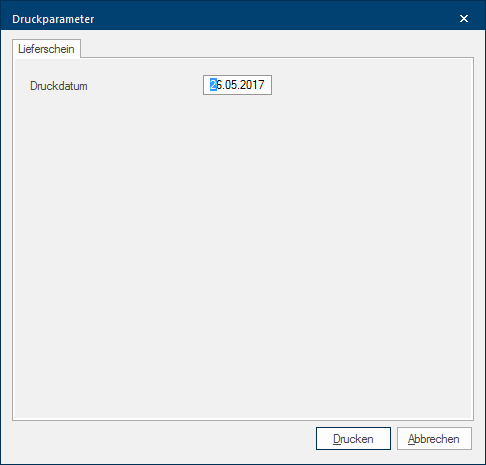
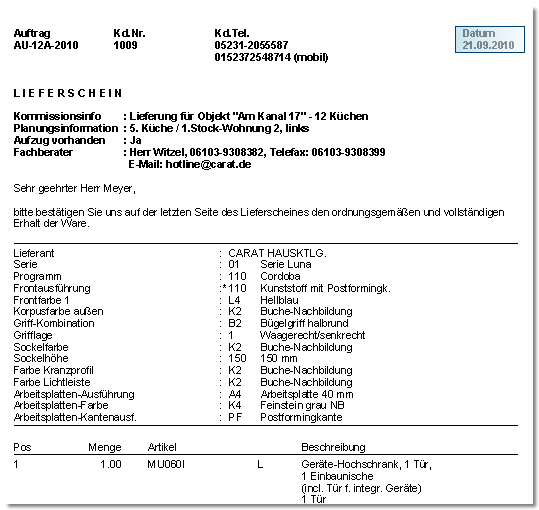
Because the delivery note only deals with a listing of all ordered articles, no settings for delivery date or payment method are necessary. Therefore can only the print dat be modified in this dialogue. Normally the current date of printing will be entered in the date field Print date. In order to be able to pre- or anti-date a printout, you have the possibility to enter an other date.
- Subsequently the provided print date will be printed on the right side area of the reference line.
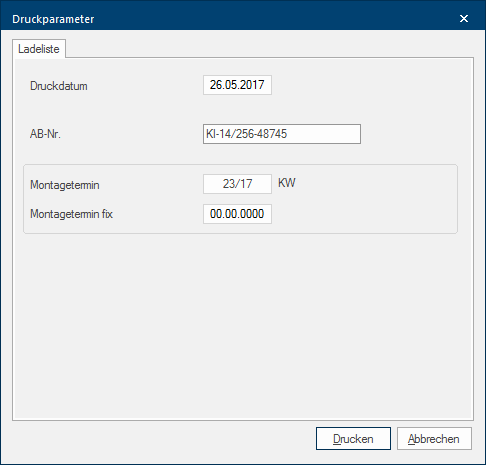
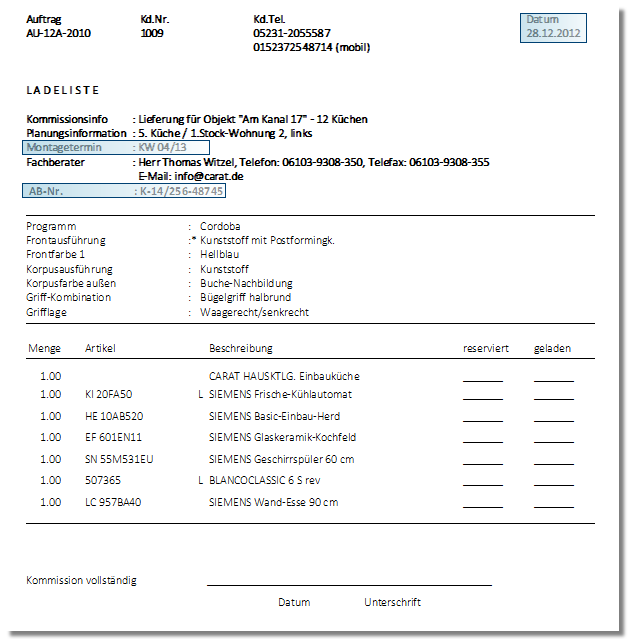
The cargo list is a form that can be used for providing and loading for the subsequent delivery of a kitchen. On demand, you can also provide, besides the print date, the OC number for the kitchen supplier and an assembly date as calendar week or fixed date.
- The print date will be printed in the Reference line. If you have entered an assembly date, and possibly an OC-number, this information will be printed in the area additional specifications.
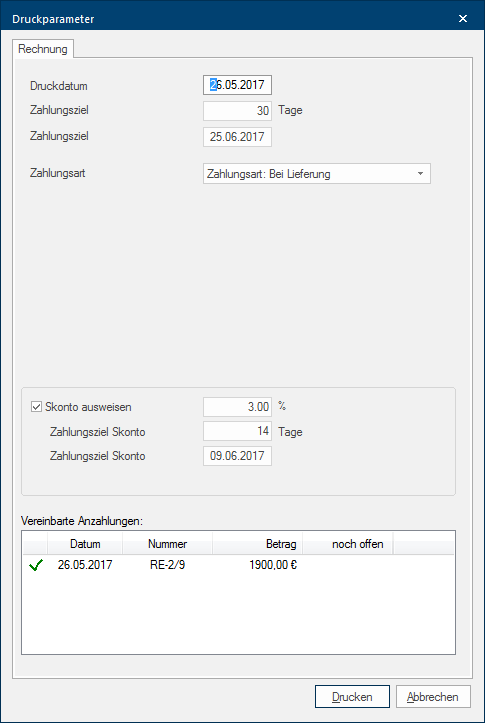
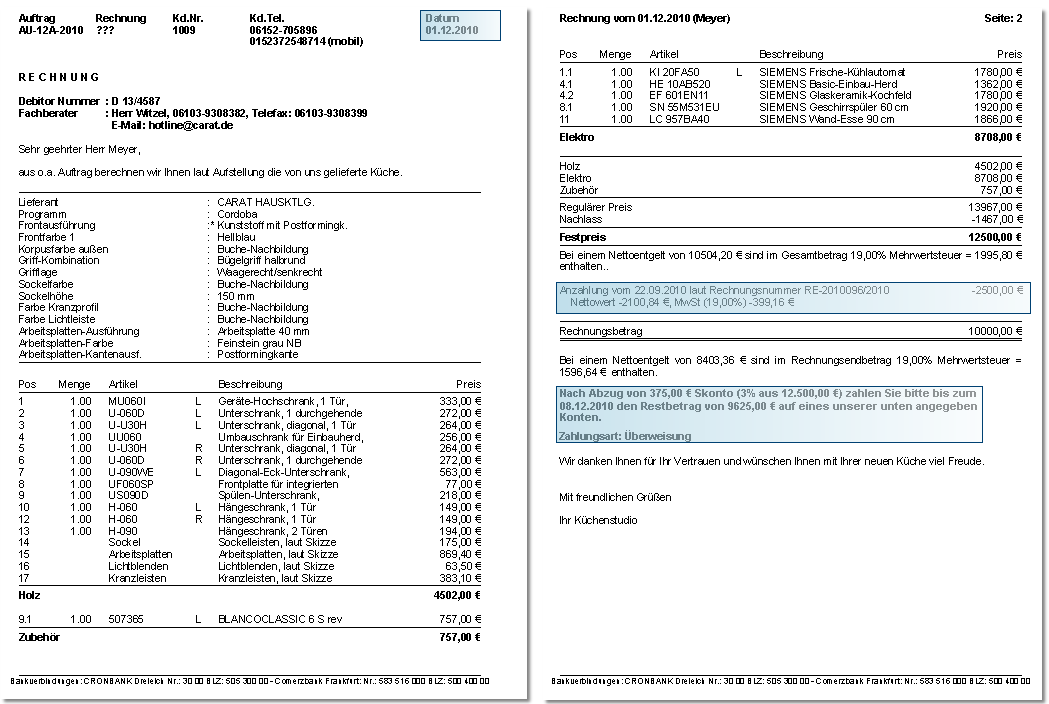
Here you can provide for the print date as well as for the payment arrangements for the invoice form.
| Name | Description |
|---|---|
| Print date | Through the print date input field, you have the possibility to either use the displayed date (with the first print it is the current date) or to pre- or anti date the date to be used for the printout. |
|
Payment term (days) Term of payment (date) |
Through the days and date input fields you can specify a separate term of payment for the deposit amount, which will be printed together with the deposit amount in the payment agreements area. It is enough to specify only the days as term of payment, based on the print date the date for the term of payment will be determined automatically. |
| Payment method | Through the payment method list box you can specify, if required, how the payment of the invoice should take place. This specification will be printed at the end of the form, in the payment agreements area. |
|
Show cash discount |
Through the show cash discount list box, you can arrange if a note about the cash discount should be printed in the payment agreements area. Additionally you can specify through the following input field a different cash discount percentage, if necessary. |
|
Payment term cash discount (days) Term of payment (date) |
Through the days or date input fields, you can provide for a term of payment for the cash discount agreement. It is enough to specify only the days as term of payment, based on the print date the date for the term of payment will be determined automatically. Normally, this field will initially display the default setting that you have specified on the page cash discount in the system options. This specification will be printed at the end of the form, in the payment agreements area. |
| Arranged deposits | If you previously have printed deposit invoices, these will be listed in the area Arranged deposits for a final check. If you have booked the deposits on the outstanding items list accordingly, you can directly see from the icon in front of each entry, if the agreed deposits have been received in full. The deposits made are during the subsequent invoice printing taken into account. |
- The following picture shows you a sample form on which you can recognise how and where the information described above will be printed.
