Edit front segmentation
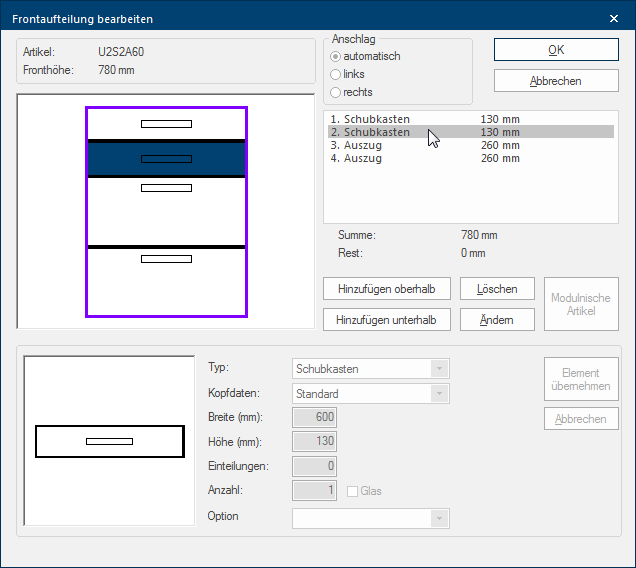
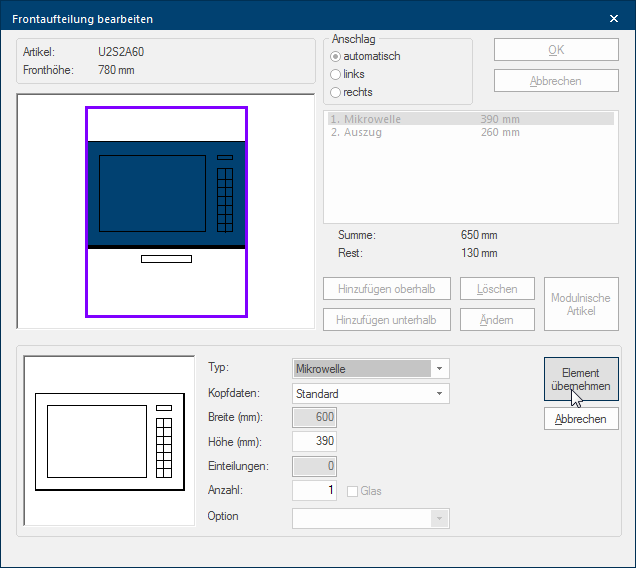
You have extensive possibilities to configure A configuration designates the specific program settings or hardware components in a computer. the front segmentation of an article individually to your own desires through the Edit front segmentation dialogue Dialogue, dialogue windows or dialogue fields are special windows in software applications. Dialogue windows are displayed by application programs in different situations to request input or confirmation from the user.. The original article name as well as the total front height is listed in the left upper range. The cabinet with its current front segmentation and the corresponding handle position per front element is displayed in the preview area. You can change the handing of the doors of the article in the right upper area. Here are also all front elements displayed as a list. You can select any front element and set the thereto fitting additional Addition (in Latin: addere) is one of four basic operations in arithmetic. In primary school and in common language it is the expression used for the adding of two or more numbers. settings in the lower area of the dialogue.
You can recognise from the list of the front elements in the upper area, at which position and with which height a front element has been planned in. First you have to select a front element in order to be able to modify the front segmentation or to delete a front element.
- For this, please click Typically the LEFT mouse button is pressed once quickly, if not specified differently. Clicking will either mark an object, or when clicking on a button, the execution of the desired activity (e.g. OK, Cancel, Close). either in the list or in the graphical preview on the front element required.
- You can delete a front element that you no longer need by clicking on the Delete button In dialogue windows you always find one or more buttons that can be activated by clicking on them. Typical functions for buttons are e.g. OK, Cancel, Apply. Buttons are always activated by a single click with the left mouse button..
- You can edit an existing front element by using the Edit button.
- With the Add above and Add below buttons you can plan a new, additional front element above or below a marked front element.
- You can find out how much space maximum remains for this from the Remain value below the list of fronts.
- You close the dialogue without making a modification effective via the Cancel button.
- You apply the modifications in the front segmentation by using the OK button.
By means of the following table, we would like to clarify you more specifically the several settings available for the selection of a front element.
|
Name: |
Description: |
|---|---|
|
Type |
You select the required front element via the Type list box If several options are provides for one function provides, are these often shown in a list. Please click on the little black triangle in the right margin to select the desired option.. |
|
You have the possibility to assign individual head data, that you have previously deposited via an deviant model head in the model selection, to one single front element via the Head data list box. |
|
|
Width |
In the width of an article is displayed as information in the Width field. |
|
Height |
Enter the height dimension with which the respective front element should be planned in in the Height field. |
|
Segmentation |
You can specify how many shelves should be included via the Segmentation field. This field is only available for the front element Shelf, or for other front elements with activated glass option The word option (from Latin: optio = free will) used in computing means a choice. In CARAT it is normally used with a list box.. |
|
Quantity |
You can specify how many times the selected front element should be planned side by side via the Quantity field. This is necessary, to be able display side by side two doors, drawers or pullouts for wide cabinets. Via the Glass checkbox A checkbox is a standard element in a graphic user interface. A checkbox has, in most cases, two states (set or not set). These usually correspond to a yes/no selection. you can furthermore specify if the front element should be shown as glass front, fitting with the selected program. |
|
Option |
Via the Option checkbox you have the possibility to optionally generate a sub-item as reminder for a build in appliance, as soon as the modified article is planned. No sub-item will be created when selecting the Normal option. |
|
Cancel |
The conducted modifications for the selected front element are discarded with a click on the Cancel button |
|
Apply element |
The selected front element with the entered settings will be planned in at the appropriate position in the front segmentation by a click on the Apply element button. |
Special Information about Module niches
If the article concerning is an article with an module niche then you have the possibility to place the special module within the module niche via the Module niche article button. Please note however, that this function is only available from a few suppliers and for a few articles.
- See also: Module niche


