The User defined Views

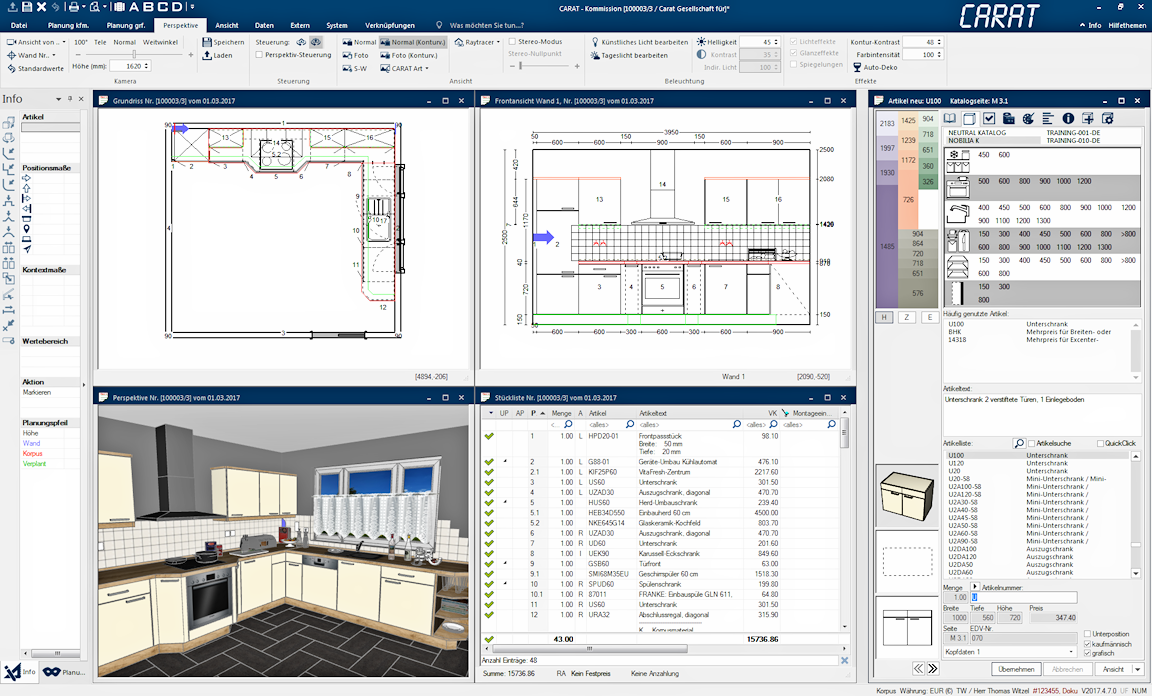
When you work on a plan with CARAT, you normally run through different stages, like the room planning, kitchen planning, quotation processing and the creation of a 3D view. For each of these stages are different views needed, so-called windows, that are displayed in the CARAT workspace area. See also: The user interface of CARAT
Naturally, you can also always open only one window Programs and files are shown in so called windows in the operating system of the same name. In CARAT each view (e.g. floor plan, article input, front view, perspective etc.) opens its own window. Multiple windows can be shown simultaneously for processing. If changes are made in one of these windows, this has an automatic effect on all other windows. in the workspace, in order to display the view in maximum size. However, you will very quickly realize, that by using several opened windows, you can use the full capability of CARAT. Because one of the strengths of CARAT lies in the possibility to work simultaneously in the graphic and commercial views.
In the menu ribbon, on the index card Some dialogue windows are too voluminous, therefore the functions are separated into indexed groups. The subgroup names typically appear on the tab of the index card at the top of the dialogue and can be selected by clicking on the appropriate tab. View are several icon buttons In dialogue windows you always find one or more buttons that can be activated by clicking on them. Typical functions for buttons are e.g. OK, Cancel, Apply. Buttons are always activated by a single click with the left mouse button. available to you, so that you can always have the optimal window arrangement for the respective working step. On the one hand, you can open specific windows, on the other hand, you can fall back on already preset window arrangements. In addition Addition (in Latin: addere) is one of four basic operations in arithmetic. In primary school and in common language it is the expression used for the adding of two or more numbers., a special icon button is at your disposal, whereby you can call up user defined window arrangements. See also: The index card - View
|
Symbol: |
Name: |
Brief description: |
|---|---|---|

|
Commission Overview |
The overview with the for a commission relevant information can be opened by using this symbol.
|
|
|
Article entry |
The article entry can be opened by using this symbol.
|
|
|
Parts list |
The parts list of the current plan will be opened by using this symbol. Using the parts list, the specified articles can be modified commercially. |
|
|
Floor plan |
The floor plan can be opened by using this symbol. The floor plan serves as the central window for graphic room and article planning.
|
|
|
Front view |
The front view can be opened by using this symbol. Front views are especially useful for working on the interior wall layout, as well as for creating installation and tiling plans. |
|
|
Perspective |
The perspective can be opened by using this symbol. The different graphic representations can be displayed and edited by using this view.
|
|
|
View A |
By using icon button A, a window arrangement is opened with which you can get a very quick overview of the plan. This window arrangement is used as default when opening a plan, as long as you have not modified the settings. Via the Floor Plan, Parts List, as well as the Perspective, you can directly access the most important areas of the plan. Furthermore, you have the ability to add or modify individual articles, using the Article Input. This window arrangement is therefore recommended as a good starting point for further processing of an already created plan. |
|
|
View B |
The Parts List, Floor Plan and Article Input will be opened by clicking Typically the LEFT mouse button is pressed once quickly, if not specified differently. Clicking will either mark an object, or when clicking on a button, the execution of the desired activity (e.g. OK, Cancel, Close). on symbol B. The Parts List stretches over the entire width of the workspace. This window arrangement works especially well for commercial post-processing of an already existing plan. |
|
|
View C |
The Floor Plan, Front View as well as the Article Input will be opened by clicking on the symbol C. As you can see in this window arrangement, the Floor Plan is provided with the largest space in the workspace, since this partitioning is especially designated for graphic planning. With the additional display of the Front View and the Article Input, you can view all the information needed for the graphic planning at all times. |
|
|
View D |
The floor plan, the parts list, the article input as well as the perspective will be opened by clicking on the symbol D. This view complies basically with view A, please note however, that in this view the article entry dialogue is shown in full height. Thus you can directly access all elements in the article input dialogue, so that this window arrangement is especially suitable for the use with catalogue versions Due to modifications to a yearly catalogue more than one following variation of a catalogue can be given. This is called catalogue version. that come with the additional QuickClick function. See also: QuickClick |
|
|
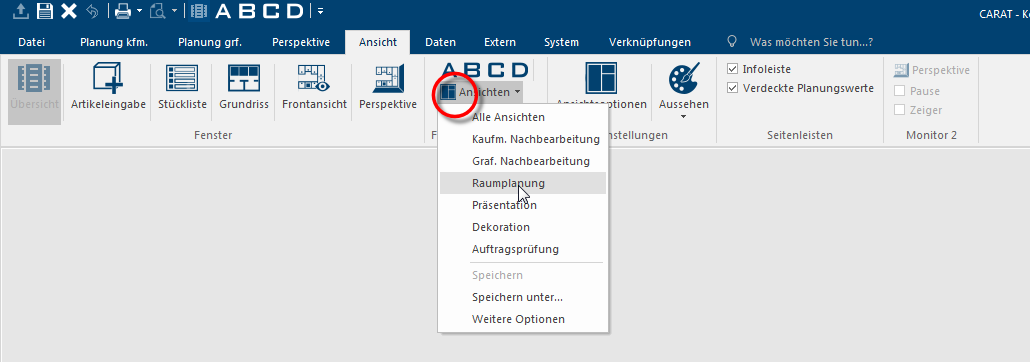
Views |
You can open or save a user defined window arrangement by using this symbol. |
|
|
Info bar |
Shows the sidebar with the article information and the measurement entry fields again. |
|
|
Blind Planning Values |
Shows the sidebar with the blind planning values again.
|
The User Defined Window Arrangements
In order to be able to adapt the windows, shown by CARAT on your work space, to your demands and the way you work, you have the possibility to save any number of user defined window arrangements. These window arrangements are saved by user, based on the currently available screen size The screen size is stated in inches (1 inch = 2.54 cm) and indicates the distance along the diagonal of the viewable screen. Unlike a TFT-Monitor however, is with a cathode-ray tube (CRT) monitor the visible range somewhat smaller than the diagonal of the CRT. and work space.
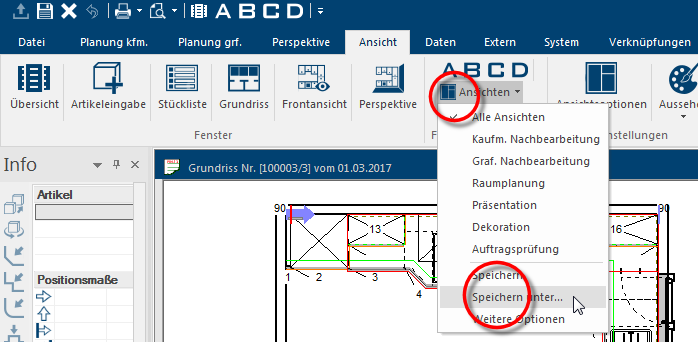
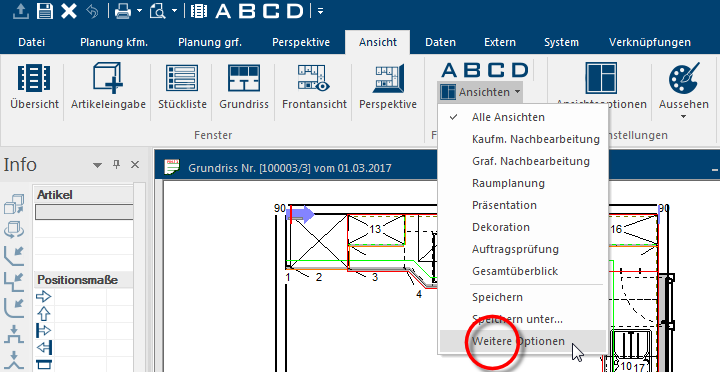
You can resort to you own window arrangements via the option The word option (from Latin: optio = free will) used in computing means a choice. In CARAT it is normally used with a list box. view in the window arrangements area of the index card View in the menu ribbon. A context menu In almost all Windows programs a click with the RIGHT mouse button opens a context menu containing a list of commands that are commonly the next step of a procedure. will open when clicking on the option view. In the upper part of the menu are all the for the user, and for the work space currently in use available user defined window arrangements listed. In the lower part of the context menu are three options, with which you can manage your user defined window arrangements.
|
Function |
Description |
|---|---|
|
Save |
Provided that you have opened and subsequently changed an already saved user defined window arrangement, you can save the changed window arrangement under the same name by using this option. |
|
Save as... |
By clicking Save as... you can save an new created window arrangement under an individual name. |
|
Further Options |
By clicking Further options... you access a dialogue, through which you can manage the window arrangements. |
Please note, that hiding or showing the menu ribbon, the several view possibilities of the dockable sidebars as well as the display of the taskbar The taskbar usually spans the lower edge of the desktop and is where you will find the Start button. You can change between open programs by clicking on the button in the task bar. of Widows, can influence the size of the work space. Therefore is also the size of the work space (in pixel Pixel or picture element identifies both, the smallest unit of digital raster graphics and the display of these graphics on a monitor with raster activation.) saved when saving a window arrangement. A change in the size of the work space afterwards has therefore always an impact on the selectable window arrangements.
- Please first arrange the windows you need according your desires on the work space of CARAT.
- Subsequently click on the entry View and select the option Save as... from the context menu.
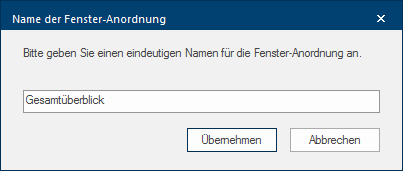
- Thereupon you can enter a meaningful name. Initially you will be shown, in the text field, a combination of the used window names, as proposal. When you click on the button Apply, the window arrangement will be saved under the name entered by you.
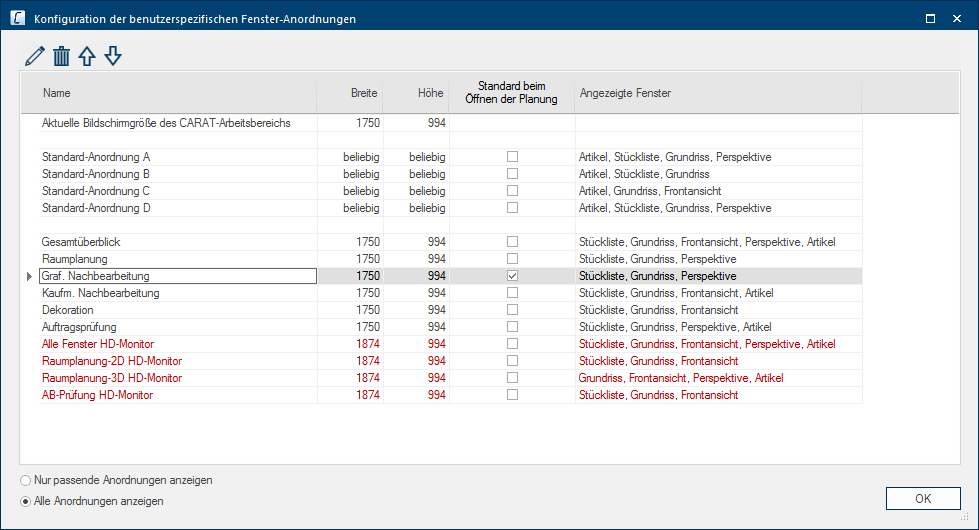
After you have saved one or more user defined window arrangements, you can manage these via the dialogue Configuration A configuration designates the specific program settings or hardware components in a computer. of user specific window arrangements.
- Click on the entry View and select the option Further options... from the context menu to open the dialogue.
- You can always find the current size of the CARAT work space, width and height in pixel, in the top line of the dialogue. Underneath are the four standard arrangements listed. The user defined window arrangements are listed underneath the standard arrangements. Here also window arrangements are shown (in red) that are not created with the current work space size, this, as far as you have selected the option Show all arrangements at the bottom left hand of the dialogue.
The standard view A will be used when an in the commission overview marked planning is opened by double click A double click is, amongst other things, needed to open files and programs or to activate an operation or a command. If the mouse cursor points to the desired symbol, you should click the left mouse button twice in quick frequency. The mouse pointer should not be moved between these two clicks. or by pressing the enter key The enter key (also known as return or enter) is located on the right side of the letter part of your keyboard and is usually labelled with an arrow pointing to the left. This key causes a line break when used in word processing and is also used in software programs to confirm the currently marked button (usually OK or Cancel).. For this, you can of course also define one of your self created window arrangements when opening a plan.
- For this, please activate the window arrangement desired via the checkbox A checkbox is a standard element in a graphic user interface. A checkbox has, in most cases, two states (set or not set). These usually correspond to a yes/no selection. in the column Standard when opening a plan.
- The column Shown windows tells you which windows will be opened by a particular window arrangement.
- You can edit, delete or change the order in the list of the available entries by using the upper icon bar.


